
Introduction 🎯
Alright, fellow devs, let’s talk browser automation. Whether you’re squashing bugs in your web app, scraping data for a side project, or just tired of clicking the same buttons over and over, automating browser tasks is a superpower. This post dives deep into the world of browser automation, comparing the big players, getting you hands-on with the crowd-favorite Playwright, and covering best practices (and even the ethical stuff!). Grab your coffee ☕, fire up your terminal, and let’s automate!
What Exactly Is Browser Automation? 🤔
At its core, browser automation is the process of using software tools to control a web browser programmatically. Think of it as having a robot assistant that can open a browser, navigate websites, click buttons, fill forms, extract data, take screenshots, and perform complex interactions – all based on your script’s instructions.
Instead of manually performing repetitive web tasks, which is time-consuming and prone to human error, automation tools execute these actions with speed and precision. This isn’t just about testing; it’s about efficiency and freeing up your valuable developer time for more complex problems.
Why Automate? The Developer’s Angle 💻
Sure, automation saves time, but why should developers specifically care?
Faster Feedback Loops: Automated tests run significantly faster than manual checks. Integrating browser automation into your CI/CD pipeline means quicker feedback on whether your latest commit broke something. Imagine catching regressions before they hit staging, let alone production!
Early Bug Detection: Finding bugs early in the development cycle is exponentially cheaper than fixing them later. Automated UI and end-to-end (E2E) tests act as a safety net, verifying critical user flows automatically.
Improved Accuracy & Consistency: Robots don’t get bored or make typos. Automated scripts execute tasks exactly the same way every time, eliminating human error and ensuring consistency across tests.
Enhanced Test Coverage: Automation makes it feasible to test across numerous browser/OS combinations and device emulations, something impractical to do manually at scale. This ensures your app works for everyone, everywhere.
Better Resource Utilization: Free up QA engineers (and yourself!) from mind-numbing repetitive checks. Let automation handle the routine stuff, allowing humans to focus on exploratory testing, complex scenarios, and new feature development.
DevOps Integration: Automation is a cornerstone of modern DevOps practices. Tools like Selenium, Puppeteer, and Playwright integrate with CI/CD tools (like Jenkins, GitHub Actions), Infrastructure as Code (IaC), and monitoring systems, enabling true continuous testing and delivery.
Choosing Your Weapon: Selenium vs. Puppeteer vs. Playwright ⚔️
The browser automation landscape has evolved. Let’s break down the main contenders:
Selenium: The Veteran 👴
History: The OG of browser automation, created way back in 2004. It’s an open-source suite that became the industry standard.
Architecture: Uses the WebDriver API. Your script sends commands (usually over HTTP JSON Wire Protocol or W3C WebDriver protocol) to a browser-specific driver (like ChromeDriver), which then translates and executes them in the browser. Selenium Grid allows for distributed testing across multiple machines.
Pros: Mature project with a massive community and extensive documentation. Unmatched browser support (Chrome, Firefox, Safari, Edge, IE, Opera) and the widest language support (Java, Python, C#, Ruby, JS, PHP). Supports real device testing via integrations with cloud providers.
Cons: Generally slower execution compared to newer tools due to the WebDriver communication overhead. Setup can be more complex, traditionally requiring manual driver management (though Selenium Manager introduced in v4.6.0 automates much of this now). The API can feel less streamlined compared to modern alternatives. Handling dynamic content often requires more explicit wait implementations. Can consume more memory and resources.
Puppeteer: The Chrome Specialist 🤖 (by Google)
History: Launched by Google around 2017-2018. It’s specifically a Node.js library.
Architecture: Communicates directly with Chrome or Chromium-based browsers using the Chrome DevTools Protocol (CDP) over a WebSocket connection. This direct line generally leads to faster and more efficient control compared to Selenium’s layered approach.
Pros: Fast execution, often significantly quicker than Selenium. Excellent for tasks specifically targeting Chrome/Chromium. Deep integration with Chrome DevTools features. Robust network interception capabilities. Good documentation. Provides Browser Contexts for test isolation.
Cons: Primarily limited to Chromium-based browsers. Language support is mainly restricted to JavaScript/Node.js. Setup requires manual configuration of the project directory structure. Community is smaller than Selenium’s and focused on JS users.
Playwright: The Modern All-Rounder 🎭 (by Microsoft)
History: Released by Microsoft in 2020. Notably, it was created by engineers who previously worked on Puppeteer, aiming to extend its capabilities across more browsers. It has seen rapid adoption.
Architecture: Similar to Puppeteer, it uses browser-specific DevTools protocols (like CDP for Chromium, and others for Firefox/WebKit) over a persistent WebSocket connection. This architecture is designed for speed, reliability, and cross-browser automation from the ground up.
Pros: Excellent speed, often benchmarked as the fastest. True cross-browser support targeting modern rendering engines (Chromium, Firefox, WebKit/Safari) with a single API. Good multi-language support (JavaScript/TypeScript, Python, Java, .NET). Superior auto-waiting capabilities significantly reduce test flakiness by automatically waiting for elements to be ready before actions. Strong network interception features. Comes with its own built-in test runner (@playwright/test). Outstanding tooling: Playwright Inspector for debugging, Codegen for recording tests, and Trace Viewer for post-mortem analysis of failures. Excellent test isolation via Browser Contexts (like fast, cheap incognito profiles). Outstanding documentation. Generally simpler setup than Selenium. Built-in mobile emulation for Chrome Android and Mobile Safari.
Cons: Being newer, its community is smaller than Selenium’s, though it’s growing very quickly. Primarily focuses on emulation for mobile testing; direct integration with real device clouds might require third-party solutions compared to Selenium’s ecosystem. Does not support legacy browsers like Internet Explorer.
The shift from Selenium’s WebDriver architecture to the direct browser protocol communication used by Puppeteer and refined by Playwright marks a significant evolution. This architectural change is a primary reason for the performance gains and increased reliability seen in the newer tools. Playwright’s design, in particular, directly addresses historical pain points like flaky tests through features like robust auto-waiting, reflecting a deliberate effort to improve upon previous generations of automation tools.
Quick Comparison Table
| Feature | Selenium | Puppeteer | Playwright |
|---|---|---|---|
| Architecture | WebDriver (HTTP/JSON Wire) | Direct (Chrome DevTools Protocol) | Direct (Browser Protocols via WebSocket) |
| Speed Rank | 3rd (Generally Slowest) | 2nd (Fast) | 1st (Generally Fastest) |
| Browser Support | Widest (Chrome, FF, Safari, Edge, IE…) | Chrome/Chromium Only | Excellent (Chromium, FF, WebKit) |
| Language Support | Widest (Java, Py, C#, Ruby, JS, PHP…) | JS/Node.js Primarily | Good (JS/TS, Py, Java, .NET) |
| Auto-Wait Quality | Manual/Explicit Waits Required | Basic Implicit/Explicit Waits | Excellent Built-in Auto-Waiting |
| Network Interception | Possible, More Complex | Robust | Robust |
| Community Size | Largest/Most Mature | Growing (JS Focused) | Smaller than Selenium, Rapidly Growing |
| Test Isolation | Manual Implementation Needed | Good (Browser Contexts) | Excellent (Browser Contexts) |
| Key Pro | Max Compatibility (Browsers/Langs) | Chrome Specialist, Fast | Speed, Reliability, Cross-Browser, Tooling |
| Key Con | Slower, More Complex Setup | Chrome/JS Limited | Smaller Community than Selenium, Less Real Device Focus |
Recommendation
For new projects in 2025 and beyond, Playwright is often the recommended choice. Its blend of high performance, excellent reliability (thanks to auto-waits), true cross-browser capability, modern API, first-class tooling, and strong backing from Microsoft addresses many limitations of older tools and aligns well with the demands of modern web development.
However, the decision isn’t always clear-cut. Selenium’s vast ecosystem, unparalleled language flexibility, and support for legacy browsers make it a viable, sometimes necessary, choice, especially for maintaining existing large test suites or in environments heavily invested in languages like Java or Ruby. Puppeteer remains a solid pick if your automation needs are strictly confined to Chrome/Chromium and your team primarily uses JavaScript. The best tool depends on your specific project requirements, team expertise, and target environments.
Getting Started with Playwright & TypeScript 🛠️
Let’s roll up our sleeves and write some code! We’ll use Playwright with TypeScript, a popular combination that leverages Playwright’s power with TypeScript’s static typing for more robust and maintainable tests. Playwright has excellent TypeScript support built-in.
Prerequisites:
- Node.js (v18 or later recommended) installed.
- A code editor (VS Code is highly recommended due to its excellent Playwright extension).
Installation & Setup:
- Initialize your project:
mkdir my-playwright-project
cd my-playwright-project
npm init -y
- Install Playwright Test: Use the init command for an interactive setup:
npm init playwright@latest
# Or: yarn create playwright
# Or: pnpm create playwright
This command will guide you through a few choices:
- Choose TypeScript.
- Specify your tests folder (default: tests).
- Decide whether to add a GitHub Actions workflow (optional).
- Confirm installation of Playwright browsers (choose true).
- What Gets Installed? Playwright sets up everything you need:
@playwright/test: The Playwright test runner package added to your package.json.playwright.config.ts: Configuration file for the test runner (browsers, reporters, etc.).tests/example.spec.ts: A sample test file to get you started.tests-examples/: More detailed examples (often testing a demo ToDo app).- Browser binaries: Downloads Chromium, Firefox, and WebKit.
Basic Test Structure:
A Playwright test file typically looks like this:
// tests/my-first-test.spec.ts
import { test, expect } from '@playwright/test';

// Optional: Group related tests using test.describe
test.describe('My Awesome Feature', () => {

  // Optional: Run setup code before each test in the group
  test.beforeEach(async ({ page }) => {
    // Navigate to a common starting URL
    await page.goto('https://your-app-url.com/');
    console.log(`Running ${test.info().title}`); // Example hook usage
  });

  // Define a test case
  test('should display the correct page title', async ({ page }) => {
    // 'page' is a fixture provided by Playwright, representing an isolated browser page
    // Test logic goes here: interact with the page and make assertions

    // Example Assertion: Check the page title
    await expect(page).toHaveTitle(/Expected Page Title/); // Uses Playwright's auto-retrying assertion
  });

  test('should allow user login', async ({ page }) => {
    // Locate elements using user-facing attributes preferably
    await page.getByLabel('Username').fill('testuser');
    await page.getByLabel('Password').fill('password123');
    await page.getByRole('button', { name: 'Log In' }).click(); // Click the login button

    // Example Assertion: Check for a welcome message after login
    await expect(page.getByText('Welcome, testuser!')).toBeVisible(); // Waits for element to be visible
  });

  // Optional: Run cleanup code after each test
  test.afterEach(async ({ page }, testInfo) => {
    console.log(`Finished ${testInfo.title} with status ${testInfo.status}`);
    if (testInfo.status !== testInfo.expectedStatus) {
      console.log(`Test failed, ended up at ${page.url()}`); // Log URL on failure
    }
  });

});
- Imports:
testfor defining tests/groups/hooks,expectfor assertions. - test(…): Defines an individual test case. The
async ({ page }) => {... }function receives fixtures, most importantlypage. - page Fixture: Represents an isolated browser page instance, automatically created for each test, ensuring tests don’t interfere with each other.
- test.describe(…): Groups related tests logically.
- Hooks (beforeEach, afterEach, beforeAll, afterAll): Run setup or teardown code before/after each test or all tests in a scope.
Core page API Examples:
Let’s look at some common actions you’ll perform:
Navigation: Go to a URL. Playwright waits for the page to load.
await page.goto('https://google.com');
Locating Elements: Find elements to interact with. Use page.locator(selector) or preferred getBy methods.
const searchInput = page.getByLabel('Search', { exact: true }); // Find by ARIA label
const luckyButton = page.getByRole('button', { name: /I'm Feeling Lucky/ }); // Find by ARIA role and text regex
const specificLink = page.locator('a:has-text("About")'); // Find link containing text using CSS :has-text
Clicking: Click an element. Playwright auto-waits for the element to be clickable.
await luckyButton.click();
Typing Text: Fill input fields. Playwright auto-waits.
await searchInput.fill('Playwright testing'); // Clears and fills
// or for simulating key presses:
await searchInput.pressSequentially('Playwright testing'); // Types character by character
await searchInput.press('Enter'); // Press a specific key
Taking Screenshots: Capture the page or specific elements.
await page.screenshot({ path: 'screenshot.png' }); // Full page
await searchInput.screenshot({ path: 'input-screenshot.png' }); // Element screenshot
Explicit Waits (Use Sparingly): Needed when auto-waiting isn’t enough (e.g., waiting for network or non-DOM changes).
// Wait for a specific element to appear (if not interacting immediately)
await page.waitForSelector('#results-stats', { state: 'visible', timeout: 5000 });

// Wait for navigation to complete after an action that triggers it
const navigationPromise = page.waitForNavigation(); // Start waiting BEFORE the action
await page.getByRole('link', { name: 'Next Page' }).click();
await navigationPromise; // Wait for the navigation initiated by the click

// Wait for page to reach a certain load state
await page.waitForLoadState('networkidle'); // Wait until network is idle

// Wait for a specific network response
await page.waitForResponse('**/api/users'); // Wait for response from this URL pattern
Assertions: Verify expectations. Playwright’s expect automatically retries until the condition is met or times out.
await expect(page).toHaveTitle(/Google Search/); // Check page title
await expect(luckyButton).toBeEnabled(); // Check if button is enabled
await expect(page.locator('#search-results')).toBeVisible(); // Check if results container is visible
await expect(page.locator('.result-item')).toHaveCount(10); // Check number of results
await expect(page.locator('.result-item').first()).toContainText('Playwright'); // Check text content
Running Your Tests:
Run all tests: Executes all .spec.ts files in your test directory across all configured browsers (usually Chromium, Firefox, WebKit) in headless mode.
npx playwright test
Run a specific file:
npx playwright test tests/my-first-test.spec.ts
Run tests matching a title:
npx playwright test -g "should allow user login"
Run in headed mode (visible browser): Useful for debugging.
npx playwright test --headed
Run on a specific browser: Use the project name defined in playwright.config.ts.
npx playwright test --project=chromium
Debug with UI Mode: A powerful visual test runner and debugger.
npx playwright test --ui
View the HTML Report: Generated after tests run (especially if failures occur).
npx playwright show-report
Playwright’s strength lies not just in the core library but in its tightly integrated ecosystem. The test runner (@playwright/test), the fixture system (page), the auto-retrying assertions (expect), and the suite of debugging tools (Codegen, Inspector, Trace Viewer, UI Mode) all work together seamlessly. This provides a comprehensive, out-of-the-box experience that often requires combining multiple libraries in the Selenium world.
Furthermore, features like reliable auto-waiting, the intuitive API (e.g., getByRole, getByText), excellent TypeScript integration, and powerful debugging tools highlight a strong focus on developer experience (DX). The goal is clearly to make writing, running, and debugging E2E tests faster, easier, and less painful for developers.
Best Practices for Robust Automation 💪
Writing automation that works is one thing; writing automation that is reliable, maintainable, and resilient is another. Here are some best practices:
Selector Strategy: Think Like a User!
The way you locate elements is critical for test stability.
Prioritize User-Facing Locators: Mimic how users find elements. Use locators based on accessibility attributes (roles, labels) or visible text whenever possible. These are less coupled to the internal DOM structure and CSS, making tests less likely to break when implementation details change.
page.getByRole('button', { name: 'Submit' })
page.getByLabel('Email Address')
page.getByPlaceholder('Enter your password')
page.getByText('Welcome back!')
page.getByAltText('Company Logo')
Use Test IDs as a Contract: When user-facing attributes aren’t stable or suitable, use dedicated data-testid (or similar data-*) attributes. This creates an explicit agreement between the application code and the test code, independent of styling or structure.
page.getByTestId('main-submit-button')
CSS/XPath as Fallback (Use Wisely): If you must use CSS or XPath, avoid brittle selectors.
- Prefer: Stable attributes (id, data-*), direct child/descendant relationships.
- Avoid: Relying heavily on generated class names (.css-123xyz), complex DOM traversals (../../div1/span), or positional indexes (button:nth-child(3)) unless absolutely necessary. Use Playwright’s CSS extensions like :has-text() or :visible for more power.
Resilience is Key: Choose selectors that are least likely to change when the UI is updated without altering functionality.
Mastering Waits: Patience is a Virtue (But Not Too Much!)
Timing issues are a major source of flaky tests.
Leverage Playwright’s Auto-Waiting: Trust Playwright’s built-in intelligence! Actions like .click(), .fill(), and web-first assertions like expect(locator).toBeVisible() automatically wait for the element to be ready. Don’t add manual waits unless you have a specific reason.
Use Explicit Waits Strategically: When auto-waiting isn’t sufficient (e.g., waiting for a network request to finish before checking its result, waiting for an animation to complete, waiting for an element to disappear), use explicit wait methods.
await page.waitForSelector(...)
await locator.waitFor(...)
await page.waitForNavigation(...)
await page.waitForLoadState(...)
await page.waitForResponse(...)
await page.waitForRequest(...)
AVOID Hard Waits: Never use hard-coded sleeps like page.waitForTimeout(5000) or browser.pause() in your tests. They make tests slow and unreliable because the required wait time can vary. Always wait for a condition, not for a fixed duration.
Handling Dynamic Content
Modern web apps are full of content that loads or changes asynchronously.
Combine Resilient Selectors and Waits: Use selectors that can find the element even if attributes change slightly (e.g., contains(), starts-with(), :has-text()). Use explicit waits (waitForSelector, expect(…).toBeVisible()) to ensure the element is present and stable before interacting.
Playwright Locators Handle Staleness: Playwright’s locators automatically re-fetch the element from the DOM each time an action is performed. This largely eliminates the StaleElementReferenceException common in older frameworks like Selenium, where you might need to explicitly re-find elements after DOM changes.
Error Handling & Debugging
Things will break. Be prepared.
Graceful Error Handling: Use try-catch blocks for operations that might fail in predictable ways, allowing your script to potentially recover or provide better error reporting.
Leverage Playwright’s Debugging Arsenal:
- Playwright Inspector: An interactive GUI to step through tests, inspect locators live, and see actionability checks. Launch with
PWDEBUG=1 npx playwright test. - Trace Viewer: The ultimate post-mortem tool. Generates a detailed trace file (enable in playwright.config.ts) with a timeline, DOM snapshots, network logs, console messages, and screenshots/video for analyzing failures, especially in CI.
- UI Mode (–ui): Visual runner with watch mode and step-by-step debugging.
- Browser Developer Tools: Still useful for manual inspection of the DOM, network, and console during headed runs.
- Logging & Screenshots: Add custom console logs (console.log) within your tests. Configure Playwright to automatically capture screenshots or video on failure (options in playwright.config.ts).
Code Structure & Maintainability
Keep your test suite clean and manageable as it grows.
Page Object Model (POM): A design pattern where you create classes representing pages or reusable components of your application. These classes encapsulate the locators and methods for interacting with that specific part of the UI.
- Benefits: Improves code reusability (use the same page object method in multiple tests), maintainability (if a selector changes, you update it in one place - the page object), and readability (tests read like user actions, e.g.,
await loginPage.loginWithCredentials('user', 'pass')). - Consideration: Can introduce some initial overhead. Evaluate if it’s beneficial for your project size and complexity. TypeScript decorators can sometimes help streamline POM method definitions.
Use Hooks Effectively: Use beforeEach/afterEach for common setup (like logging in, navigating) and teardown. Use beforeAll/afterAll for setup/teardown that needs to happen only once per worker process.
Test Isolation: Ensure tests don’t depend on each other’s state. Each test should start fresh, ideally using Playwright’s automatic Browser Context isolation.
Configuration Management: Use environment variables or configuration files (playwright.config.ts) for settings like base URLs, timeouts, and credentials instead of hardcoding them.
The overarching goal of these practices is to achieve resilience over brittleness. Tests should verify the intended user experience and withstand minor, non-functional changes to the app’s implementation (like CSS tweaks or minor DOM restructuring). Auto-waiting and user-centric locators are key tools in achieving this.
Furthermore, the sophisticated tooling provided by frameworks like Playwright actively enables these best practices. Tools like the Trace Viewer don’t just help fix bugs; they provide the necessary visibility to understand why a test failed due to timing or selector issues, encouraging the adoption of more robust waits and locators.
The Ethics of Automation: Scraping Responsibly 🧐
Browser automation isn’t just for testing; it’s incredibly powerful for web scraping – extracting data from websites. But this power comes with significant ethical and legal responsibilities. Ignoring them can lead to IP bans, legal trouble, and harm to the websites you scrape.
Rule #1: Check for an API First!
Before you even think about scraping, check if the website offers a public API (Application Programming Interface). APIs are the intended, legitimate way to access data programmatically. Use the API if available!
Respect robots.txt
Almost every major website has a file at /robots.txt (e.g., https://example.com/robots.txt). This file contains rules for automated bots, specifying which parts of the site they are allowed or disallowed from accessing. While technically possible to ignore, ethical scraping always respects robots.txt directives. Check the User-agent: and Disallow: lines.
Read and Honor Terms of Service (ToS)
Websites have Terms of Service (or Terms and Conditions) that outline the rules for using the site. These often explicitly prohibit or place restrictions on scraping. Violating ToS can have serious legal consequences under laws like the Computer Fraud and Abuse Act (CFAA). The landmark HiQ Labs vs. LinkedIn case highlighted the legal risks of scraping in violation of ToS, even for publicly accessible data. Always review the ToS carefully.
Rate Limiting: Be a Good Neighbor
Bombarding a website with rapid-fire requests can overload its servers, degrade performance for other users, and get your IP address blocked. Implement delays between your requests – start with a few seconds (e.g., 1-5 seconds) and adjust based on the site’s responsiveness. If you get HTTP 429 (Too Many Requests) or 5xx errors, back off significantly. Consider scraping during the website’s off-peak hours.
Data Privacy & Copyright:
- Privacy: Be extremely cautious about collecting Personally Identifiable Information (PII) or any sensitive data. You generally need explicit consent. Be aware of regulations like GDPR (Europe) and CCPA (California) if applicable. Anonymize data where possible.
- Copyright: Website content (text, images, data) is often copyrighted. Scraping and republishing copyrighted material without permission can lead to infringement claims. Attribute your sources if required or appropriate.
Identify Your Bot
Don’t try to hide. Use a descriptive User-Agent string in your requests that identifies your scraper and ideally provides contact information (e.g., a link to your project or company website). Transparency helps website owners understand traffic and allows them to contact you if issues arise. Example: User-Agent: MyEthicalScraper/1.0 (+http://mywebsite.com/ethical-scraping-policy).
Be Transparent (Where Applicable)
For smaller-scale or research-focused scraping, notifying the website owner might be feasible and appreciated, though often impractical for large operations.
Following these ethical guidelines isn’t just about politeness; it’s crucial risk management. It helps you avoid legal battles (CFAA, GDPR, copyright), prevents your IP from being blocked, protects the resources of the websites you rely on, and maintains your reputation as a responsible developer.
Notice the strong interplay between technical implementation and legal/ethical compliance. Your code’s behavior – how fast it makes requests (rate limiting), how it identifies itself (User-Agent), and which pages it accesses (robots.txt adherence) – directly impacts whether you are scraping responsibly and legally. Writing ethical scrapers requires both technical skill and careful consideration of the rules.
Automation Humor Break 😂
Let’s face it, automation can be frustrating sometimes. Every developer who’s tried to automate a non-trivial task has likely encountered these scenarios:
1. The Automation Time Sink
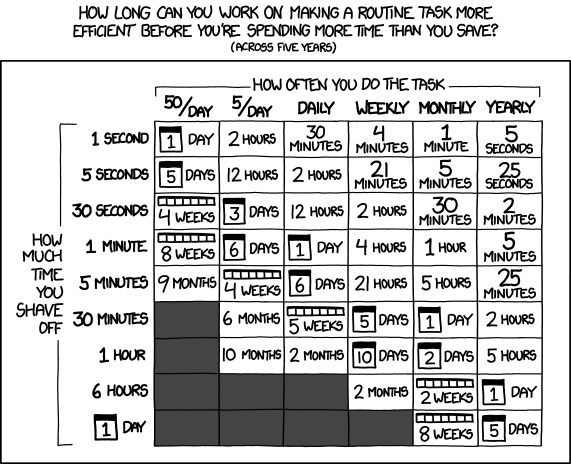
This classic chart perfectly captures the developer’s eternal struggle: figuring out if the time spent automating a task will actually be less than the time saved by doing the task manually over its lifetime. The title text adds another layer: “Don’t forget the time you spend finding the chart to look up what you save…”. We’ve all been there, spending days optimizing a script that saves seconds.
2. “It Works On My Machine!”

The timeless excuse. Your beautiful automation script runs flawlessly on your local setup, but fails spectacularly in the CI pipeline or on a colleague’s machine. Environment differences, dependency mismatches, network quirks – the reasons are endless, but the phrase remains the same. It’s the bane of testers and DevOps engineers everywhere.
3. Automation: Theory vs. Reality
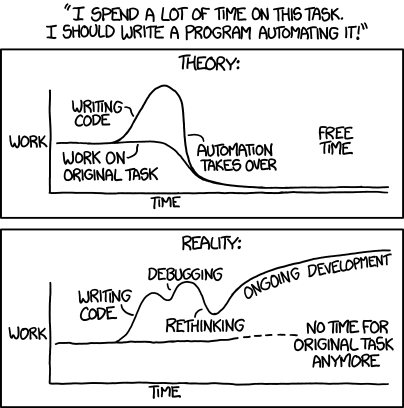
Theory: Spend a bit of time coding, then reap the rewards of effortless automation. Reality: The “coding” phase quickly morphs into “debugging,” “rethinking,” and “ongoing development,” sometimes consuming so much time you forget about the original task you were trying to automate. Automation requires maintenance!
Sharing these common struggles and jokes helps build camaraderie. We’re all in this digital trench together, battling flaky tests and elusive bugs!
Conclusion: Go Forth and Automate! ✅
Browser automation is an indispensable skill for modern developers. It streamlines workflows, enhances testing, ensures quality, and frees up valuable time.
We’ve seen how the tools have evolved, with modern frameworks like Playwright offering compelling advantages in speed, cross-browser reliability, and developer experience through features like auto-waiting and exceptional tooling. Getting started with Playwright and TypeScript is straightforward, allowing you to write robust, maintainable tests.
Remember that effective automation hinges on best practices: prioritizing user-facing selectors, mastering waits (and avoiding bad ones!), handling errors gracefully, and structuring your code for maintainability. And when venturing into web scraping, ethical considerations are paramount – respect APIs, robots.txt, ToS, rate limits, and privacy.
The world of web automation is vast and constantly evolving. Hopefully, this guide has equipped you with the knowledge and tools to dive in. Start small, automate a repetitive task, explore the Playwright documentation, and discover the power of programmatic browser control.
Happy automating! 🎉